For successful work with a rather complicated device, it is necessary to understand in more detail the menu items and the most important parameters, on which the communication quality will depend.
First, let's look at the MENU of the BAOFENG UV-82 radio step by step. The most important points are highlighted in blue.
0. SQL - setting the sensitivity of the squelch, possible values 0 - 9, optimum 5;
1. STEP - setting the frequency tuning step.
2. ТХР - change of transmitter power. Possible values are Low / High (small/large).
3. SAVE - saving the battery charge in the receive mode, possible values OFF, 1, 2, 3, 4.
4. VOX - enable the function of voice control of the transmitter, as well as adjust the VOX response sensitivity.
5. WN - selection of a wide or narrow band of reception/transmission modes (Wide / Narrow).
6. ABR - the operating time of the screen backlight is set.
7. TDR - operating mode of receivers A and B. Three options: the station receives only on channel A, only on channel B, or on both channels simultaneously.
8. BEEP - sound accompaniment of pressing keys, On / Off.
9. TOT - automatic shutdown of the transmitter after a specified time, possible values 15 - 600 seconds.
10. R-DCS - enable and select the digital code DCS in the receive mode.
11. R-CTCSS - enable and select the analog CTCSS tone in the receive mode.
12. T-DCS - enable and select the digital DCS code in the transmission mode.
13. T-CTCSS - enable and select the analog CTCSS tone in transmission mode.
14. VOICE - voice confirmation of pressing keys and working with the menu.
15. ANI-ID - automatic identification by number. The code is broadcast when the "ALARM" function is on.
16. DTMFST - audibility of DTMF tones during transmission. OFF - no tones can be heard, DTST - only manually dialed tones can be heard. ANI-ST - Preset tones are heard. DT + ANI - all tones are heard.
17. S-CODE - a set of 15 five-digit DTMF codes. One code from the set is transmitted when PTT-ID is enabled in menu item 19.
18. SC-REV - frequency scanning method. TO - the scanner pauses for 3 seconds when a signal is found, then continues scanning. CO - the scanner in the presence of a signal is delayed until the signal disappears, then scans the range further. SE - the scanner stops scanning when a signal is found.
19. PTT-ID - code transmission. OFF - not transmitted; BOT - at the beginning of the transmission; EOT - at the end of the program; VOTN - at the beginning and at the end of the transmission.
20. PTT-LT - PTT-ID code transmission delay, in milliseconds.
21. MDF-A - format for displaying data about channel A. CH - channel number; NAME - channel name (programmed from a PC); FREQ - channel frequency.
22. MDF-B - as in paragraph 21, only for channel B.
23. BCLO - prohibition of transmission on a busy channel, ON / OFF.
24. AUTOLK - keyboard auto-blocking, ON / OFF.
25. SFT-D - direction of the transmission frequency shift relative to the reception frequency, three values: OFF - no shift; "+" - shift up; "-" - shift down.
26. OFFSET - set the offset value from 0 to 69.99 MHz, 10 kHz step.
27. MEM-CH - saving the frequency in the device memory cell.
28. DEL-CH - delete channels.
29. WT-LED - select the backlight color in standby mode.
30. RX-LED - select the backlight color in the signal reception mode.
31. TX-LED - selection of backlight color in transmission mode.
32. AL-MOD - setting the operating mode of the ALARM function. SITE - the signal sounds only in the speaker; TONE - the alarm signal is broadcast; CODE - ANI code is issued.
33. BAND - selection of VHF / UHF band.
34. TDR-AB - setting the activity of the receiver A or B in the dual-frequency reception mode.
35. STE - elimination of the hissing sound at the end of the ON / OFF transmission.
36. RP-STE - elimination of hissing sound when working through a repeater.
37. RPT-RL - repeater end tone delay × 100 ms, value OFF / 1 - 10.
38. PONMSG - information displayed at power-up is programmed from a PC.
39. ROGER - a sound signal transmitted over the air at the end of the program, ON / OFF.
40. A / B-BP - "ROGER" sound signal at the end of reception, ON / OFF.
41. RESET - reset settings. VFO - reset menu and channel settings to default. ALL - hard reset to default and clears all device memory cells.
Key assignment
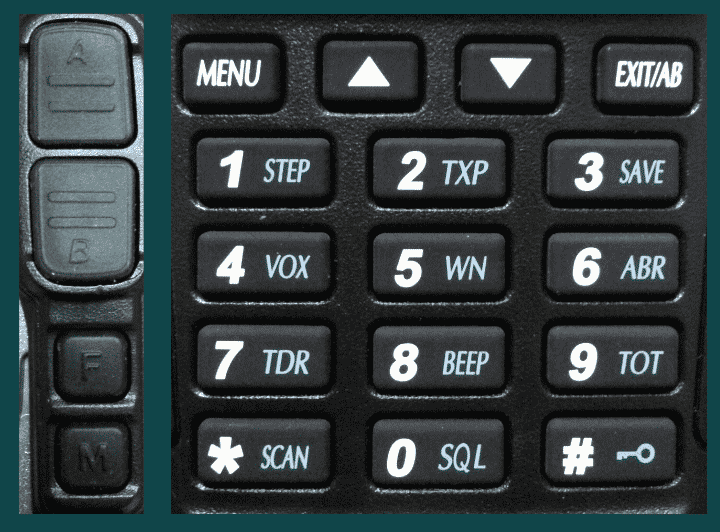
1. Keys "A", "B" - separate PTT buttons for each line A and B.
2. "F" - short press turns on / off the FM receiver. Press and hold activates the ALARM function.
3. "M" - turn on / off the LED flashlight. A long press will deactivate the squelch (monitor function).
4. "MENU" - used to enter the Menu, as well as to confirm the changes made in the settings.
5. "▲ ▼" - these keys allow you to scroll through frequencies with a preset step or channels if the station is in channel mode. Also, when working with the Menu arrows, you can select the desired setting values.
6. "EXIT / AB" - used to exit the Menu, as well as to switch active receivers (line A / line B). In FM radio mode, this key can switch the frequency ranges (65 - 75 MHz / 76 - 108 MHz).
7. Numeric keys allow you to directly enter the desired frequency. If the station is in channel mode, you can dial the number stored in the memory of the channel. Together with the "MENU" button, you can select the most demanded functions using the numeric keys (marked on the keys in blue). The "MENU" button is pressed in succession, then the desired key.
8. "#" - This key can be used to instantly switch the transmitter power (HIGH / LOW). The display will show the change in power using the L segment. When there is a segment, it means that the minimum power is on. The absence of this segment means the inclusion of maximum power.
Menu operation:
1. Press the "MENU" button;
2. Scroll through the menu items with the "▲ ▼" buttons;
3. Enter the sub-items with the "MENU" button;
4. Change the settings using the "▲ ▼" buttons;
5. Confirm the changes by pressing the "MENU" button;
6. Exit the menu by pressing the "Exit" button;
Attention!
1. The radio does not have a special button to switch between VFO / MR (frequency / channel) modes. Therefore, the change of these modes is as follows: with the device turned off, press and hold the "MENU" key, then the device turns on. The modes change.
2. To switch bands, enter the 33rd menu item, or in frequency mode, directly enter the frequency within 136-174 / 400-520 MHz in line A or B.
Note: the radio provides the ability to emergency call subscribers working with you on the same channel. To activate this function, you must first change in 32 menu item "Site" value to "Tone" value. Now if you hold down the F (call) button for 3 seconds, the alarm transmitted on the current channel will be triggered. Pressing the same button again briefly stops the transmission of the emergency call.
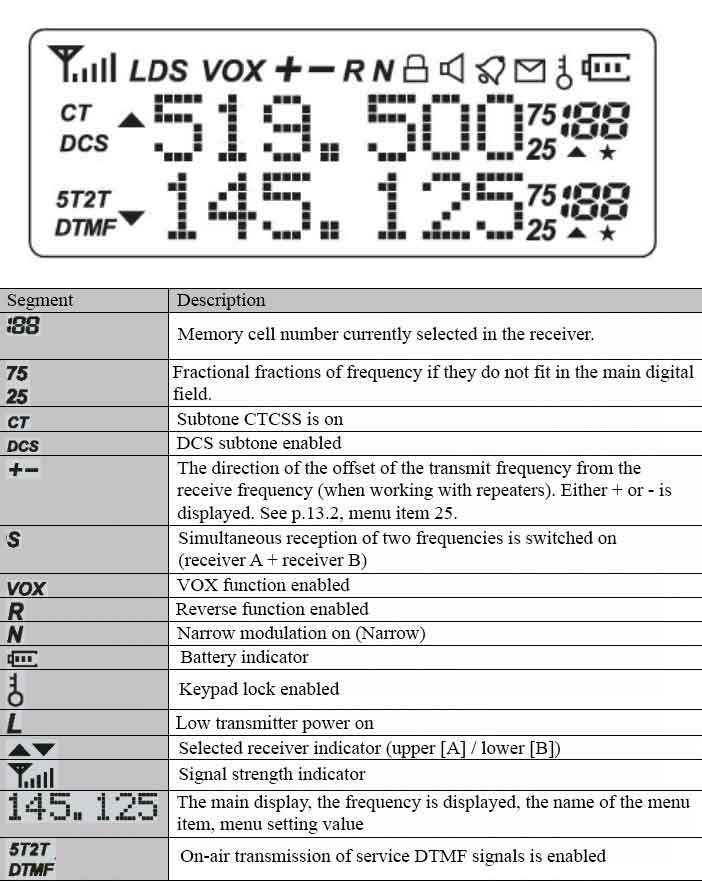
Device screen and symbol meanings
Working with basic functions
1. Scan
It is switched on by pressing and holding the (*) key for 3 seconds. The device pre-switches to frequency mode. Scanning will start at the specified default step of 25 kHz. The step can be changed using item 1 of the menu. You can also change the scanning method (item 18 of the menu). You can stop scanning by pressing the (Exit / AB) key.
2. Keypad lock
Turned on by pressing and holding the (#) key. Turns off in the same way.
3. Squelch
It is adjusted based on the level of interference at the receiving point. It is necessary to set such a value so that the radio can receive weak signals, but, at the same time, does not respond to strong interference. The optimal value is from 3 to 6. The higher the number, the more difficult it is to open the squelch. When set to "0", the squelch is disabled. Direct access: button (Menu) + (0). The required value is selected by arrows.
4. VOX function
Recall that this function will help you work with the station hands-free. The transmission will be carried out when a sound signal (voice) appears near the microphone. It can be activated either through the menu, or by instant access to this function by successive pressing of the (Menu) and (4) keys.
5. TOT function
Limits the maximum continuous transmission time from 15 to 600 seconds. Direct access to this function is by successive pressing of the (Menu) + (9) keys.
6. TDR function
Allows you to control the work of independent receivers. You can set the walkie-talkie to receive either only on channel A, only on channel B, or on both channels simultaneously. Direct access: (Menu) + (7).
7. WN (Wide / Narrow) function
Switches between wide or narrow reception / transmission bandwidth. In this case, the bandwidth changes from 5 to 2.5 kHz. Quick access: button (Menu) + (5).
8. BEEP - you can quickly turn off or turn on the sound of keystrokes. Direct access: key (Menu) + (8).
9. STEP - the function of changing the tuning step. The default is 25 kHz. This is the standard "spacing" between channels (eg LPD band). If necessary, you can change this value. The smaller it is, the more detailed, but the slower the range scan will be. Direct access: key (Menu) + (1).
10. SAVE function - allows you to enable saving battery consumption in receive mode. The higher the value (from "1" to "4"), the higher the savings. But one should not forget that there is a possibility of missing the correspondent's call, since the receiver in the economy mode is turned off for some part of the time (it is turned on by short-term pulses). For example, if the value is "1", the receiver works 3/4 part of the time, and 1/4 part is off. And when the value is "4" the receiver 1/4 part works, and 3/4 is off. Direct access to the function key (Menu) + (3).
Note: Other functions such as power transfer, emergency call have been described above. Other functions can be activated only when entering the main menu of the device.
FM receiver setup
The built-in FM radio receiver is turned on by pressing the side F key. It has two ranges: 65 - 75 MHz and 76 - 108 MHz. You can switch between ranges using the Exit / AB key. Tuning to the station is made by short pressing of the key (*). In this case, the receiver starts scanning until the nearest station is found. Pressing this button again starts scanning. If you know the frequency at which the FM station is operating, then you can directly enter it from the numeric keypad.
● This model has one more remarkable property, which few people know about - it is the ability to work in the KROSSBAND mode. The radio is capable of transmitting in one range and receiving in another. Due to the presence of a double PTT button and having tuned receivers A and B to different bands, as well as activating double reception (through item 7 of the menu), we receive a repeater at frequency A (VHF or UHF), and transmit at frequency B (UHF or VHF) by pressing the PTT button - B.
● For the latest versions of this model's radios, you can set any split frequency value via the "OFFSET" menu item. Therefore, work in "crossband" becomes an easily accessible option, carried out using one of the PTT keys.
● Attention! When installing the battery, this model of the walkie-talkie has one feature: it is necessary to press the battery to the station, first moving it slightly down so that it falls into the grooves. Then it follows, pressing its upper part, push it in until it clicks. The battery should be free to reach the stop. If the movement is difficult, it must be removed and the procedure repeated again. To remove the battery, press the two side buttons located at the top of it, and then pull down.
Examples
Example 1
Channel recording:
We dial the desired frequency from the keyboard. If the frequency is not dialed, then we correct the tuning step through step 1. The standard step is 25 kHz;
Set the required transmitter power (Low / High values) by pressing the "#" button once;
Set, if necessary, the remaining parameters of the future channel: CTCSS / DCS tones, repeater frequency shift, noise reduction level (SN), etc .;
Go to "MENU", select item 27, press "MENU" again;
Select the CH channel number out of 127 possible using the "▲ ▼" buttons;
We confirm the recording of the channel by pressing the "MENU" button;
Exit the menu by clicking "Exit";
Example 2
Recording a channel with a spaced frequency of reception and transmission (for work through a repeater):
We are dialing the receiving frequency of the future channel, having previously set the desired tuning step;
Go to the menu and select item 25. Turn on the frequency shift down or up by selecting the symbols [-] or [+]. Save the shift by pressing "MENU";
While in the menu, select item 26. Using the "▲ ▼" buttons, set the shift value (from 0 to 69.99 MHz). We save the changes by pressing "MENU" once;
If necessary, set the required CTCSS or DCS subtone from a number of analog and digital codes through menu items 10 - 13: a) receive only; b) only for transfer; c) for reception and transmission;
We set the rest of the channel parameters (power, BB level, etc.), if necessary. Save all settings with the "MENU" button, then exit the menu;
We check the frequency shift during transmission by pressing PTT - the frequency should change by a given amount;
Note: you can record a channel separately for receivers A and B with their own parameters. For this, the station has independent receivers and a double PTT button, thanks to which a call can be made from channel A or B without switching channels.
Example 3
Delete channels:
We go to the menu by pressing the "MENU" button;
Find item 28 with the "▲ ▼" buttons;
Press "MENU" again and use the "▲ ▼" buttons to select the CH channel number to be deleted;
Confirm deletion by pressing "MENU";
Select the next channel to be deleted or exit the menu by pressing the "Exit" key;
Example 4
Recording CTCSS or DCS Tones:
We go into the menu and select items 10-13;
Press the "Menu" button again and use the "▲ ▼" arrows to select the desired subtone value. We install it separately for receiving and transmitting (10-11 points for the receiver - respectively digital or analog tone, 12-13 points for the transmitter, respectively, digital and analog). For example, item 11 is the setting of the CTCSS code from the range of 67.0; 69.3 ......... 254.1 when receiving (RX). The default is OFF. Use the "▲ ▼" arrows to select the desired tone.
We save the changes by clicking "Menu".
It is important to note that if you have set an analog tone, then you do not need to set a digital one. Or vice versa. It is also necessary to set the codes so that the tone value on one radio on the transmission would coincide with the value set on the other radio on reception. It is easier to set the same tones on all radios for both transmission and reception.
Example 5
Docking of a walkie-talkie for simultaneous operation on two channels with other models (for example, with two Kenwood TK-666 walkie-talkies):
We select the necessary channels on the Kenwoods. On one radio we take, for example, the first channel (frequency 462.125 MHz, tone 69.3), on the other radio - the second channel (frequency 462.225 MHz, open, no tone).
On the Baofeng UV-82 radio, we write these frequencies into memory, for example, into cells 1 and 2, respectively (not forgetting to write down the CTCSS tone for the second channel for reception and transmission 69.3).
We activate the function of double reception through the 7th menu item.
Set the first recorded channel in the first line, scrolling through the channels using the "▲ ▼" buttons, move the cursor from line A to line B with the Exit / AB button and also select the second recorded channel.
Done! Now we press the transmission button A and speak with the first radio, press the transmission with the B button and speak with the second radio. We accept them one by one without switching channels.
Example 6
Walkie-talkie firmware for permitted frequency sections
To begin with, it is best to delete all factory channels, since they are not in the LPD, FRS, PMR bands. This is done through 28 menu items, as described above.
It is best to use the LPD band as it has 69 channels and is almost in the middle of the UHF band. Most of the models of walkie-talkies have the best power output in this particular range. Channels are recorded, starting from the 1st with a value of 433.075 MHz, as described above (after 27 points). You can also record 8 PMR channels. The first channel is here 446.00625 MHz. What is important here is that you must set the STEP tuning step to 6.25 kHz. The values of these channels can be found on the page with allowed frequencies.
Example 7
Scanning subtones
This radio model is capable of scanning CTCSS / DCS subtones with certain manipulations.
What is required for this? First, you need to set an analog or digital subtone of any value, respectively, through the 11th or 10th menu item. Then you need to turn on the transmission from the second radio with a given frequency and a subtone of any value. Now on the receiving radio, being in the menu of items 10 or 11, you must press the Scan button. The radio will start scanning subtones.
Important:
1. Scanning subtones will start only when there is a signal.
2. The radios must have the same frequencies or channels.